
Best Swim Gear
7 Best Swim Snorkels for Better Technique and Faster Swimming
Ready to throw down on a new swimmer’s snorkel? Here are reviews of the best swim snorkels for lap swimming.
 by
Olivier Poirier-Leroy
by
Olivier Poirier-Leroy
For many of us, the backyard swim pool is the centerpiece of our summer days.
Whether that means cooling off with our feet dangling in the water, working it out with some water aerobics classes, or getting fired up with an impromptu game of water volleyball with friends and family, the pool is where the fun happens.
But first, your pool, and more importantly, the pool water, needs to be ready for action.
Which means testing!
Using a pool test kit regularly helps maintain a healthy pool, avoiding the spread of bacteria, algae, and even protecting your pool equipment.
A lot of new pool owners feel intimidated by testing pool chemistry, believing that there is too much to learn or that properly balancing pool water is impossible without professional help.
But using a pool test kit is actually quite straightforward, and once you get a quick lay of the land (or rather, the water), you will quickly feel comfortable testing your pool as part of your regular cleaning and maintenance schedule.
This article lays out everything you need to know about the almighty pool test kit, including the different types, how often to test, and much more.
Let’s jump right in.
The pool test kit is something that helps you to maintain the chlorine and pH levels in your pool. Done weekly, your swimming pool will remain sparkling and clean.
The purpose of the test kit is to determine if your water chemistry needs adjustment, which can be done by adding chemicals or minerals. While the main things you want to test for are the chlorine and pH levels, test kits also give an overview of cyanuric acid, calcium, phosphate, copper, and salt levels.
Test kits help you ward off a lot of problems that can happen with the structural parts of your swimming pool, too.
When the pH, alkalinity, and hardness of the pool water are off, corrosion soon follows with the pool liner, filtration equipment, or even the walls of the pool.
Test kits are your best friend when it comes to swimmable water and extending the lift of your swim pool and equipment.
While you can take a water sample and take it down to your local pool store to have it professionally tested, there are plenty of affordable and accurate pool test kits that pool-owners can use at home.
Here are the main types to look out for:
In all three cases, testing can be done very quickly, with results showing up in seconds.
Regular testing of the pool water is crucial for keeping the water balanced.
Chlorine and pH should be tested at least a couple of times per week. (The CDC, presumably referring to public pools that see a ton of foot traffic, recommends testing twice a day.)
On top of regular testing, there are also other special occasions when you should definitely be testing the pool water:
New pool owners should test the chlorine and pH 3-5x per week to get a sense of how pool chemicals and chemistry fluctuate based on use and how the elements can affect the water.
Things like calcium, cyanuric acid, and alkalinity are tested less frequently as they take longer to “move” in terms of readings. Depending on the use of your pool, these should be tested weekly, potentially even monthly.
A generalized overview of how often you should test the water:
Chlorine. At least once a week, preferably two or three times. Test both free and total chlorine. Chlorine levels should be within 1-5mm, preferably between 3-5ppm.
pH. Check every couple of days. Look for levels of 7.2-7.8.
Alkalinity. For vinyl or fiberglass swimming pools, an acceptable range is 100-140.
Calcium hardness. Test at least once per month to help prevent your pool water from becoming unbalanced. The target range is 300-500 ppb.
Phosphate. 300-500pb and below. Testing for phosphates–food for algae–is possible but rarely necessary.
Total Dissolved Solids. Aim for less than 1500 ppm. (Not applicable to saltwater pools.)
One of the most important things you have to do when testing the water is collect a sample that is indicative of the overall pool water chemistry.
Commonly, pool owners will kneel and collect water or test the water that is coming out of the return jets/inlets or fresh from the pool skimmer. This water has been freshly treated and cleaned, so it won’t be as representative of the rest of the pool.
Collect water away from the return jets; either at the ends or closer to the middle of the pool.
Additionally, sink the sample collecting container up to your elbow (12 to 18-inches) to avoid collecting water that is sitting at the surface.
Test strips are the most affordable of the pool testing kits. They are also accurate in a general sense. That said, if peak accuracy is a concern for you, lean towards a digital test kit or a liquid test kit.
Using a test kit is straight-forward:
Liquid test kits are very popular, and my childhood is full of memories of lifeguards using commercial-grade liquid test kits at my early morning swim practices. Using a collector and reagents, you can quickly see what needs to be done to adjust pool chemistry.
Once you’ve completed your testing, rinse it out (not in the pool, but with a freshwater source like a sink or the garden hose), dry it out, and along with the reagents (test solutions), store it out of the sun and direct heat.
It’s hard to understate how crucial testing your pool water regularly is. Inground and above-ground swim pools can quickly become hotbeds of bacteria and infectious disease when chemicals are ignored.
With the right testing, not only are we talking about safe water for swimmers, but also the structural integrity of the pool and pool equipment.
And unless we are regularly testing the water, how we are going to know if the water is optimally balanced? Or what kind of nastiness is floating around in it? Or the number of pool chemicals that need to be added to the water?
Testing the pool water is the most frequent maintenance task that has to happen with your swim pool.
This means, that with time, you will get pretty good at it ?

Subscribe to the YourSwimLog.com newsletter and get tips and advice on how to swim faster every weekday morning, straight to your inbox.
Join 33,000+ swimmers, coaches, and swim parents learning what it takes to swim like a boss.
Unsubscribe anytime. Email will never be shared or sold.

Olivier Poirier-Leroy Olivier Poirier-Leroy is the founder of YourSwimLog.com. He is an author, former national level swimmer, two-time Olympic Trials qualifier, and swim coach.
Ready to throw down on a new swimmer’s snorkel? Here are reviews of the best swim snorkels for lap swimming.
Looking to get some new swim gear on a budget? Shop the best Black Friday deals for swimmers in this exclusive guide.

Looking for the best swimming app to maximize your time and effort in the water? Here’s a look at the top swim apps for conquering your swim workouts.
Wondering how often you should be testing the water in your pool or spa? Here’s a detailed look at how frequently you should test your pool. Your swimming pool and spa relies on being properly balanced to keep the water clean and safe for swimming. As a pool owner, you
Fed up with the effects and smell of chlorine in your hair after swimming? Here is how to remove chlorine from your hair once and for all.
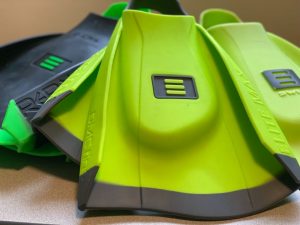
The DMC Elite fins are high-performance training fins for competitive swimmers. Here’s a review of why these fins are flat-out awesome.

LANE 6 PUBLISHING © 2012-2024 · PRIVACY POLICY · RETURN POLICY · TERMS OF SERVICE · AFFILIATE DISCLOSURE